
A few modern cloud-friendly tools for load testing were covered in my previous post. Here I’m going through an example of one setup - a k6 + TypeScript + Azure DevOps bundle. The goal is to create a highly customised testing pipeline in Azure with tests maintained by developers.
If you haven’t heard of k6, it’s an open-source load testing tool with full support of scripting scenarios in JavaScript and, of course, TypeScript. k6 is quite friendly to folks familiar with web development and JavaScript. For others I’d recommend Apache JMeter as the default option.
1. Is TypeScript worth the effort for k6?
This official template is the best way to start TypeScripting with k6. It transpiles TypeScript in the traditional way — leveraging WebPack and Babel.
Using TypeScript for testing might be perceived as extra hustle. Fair enough, let’s compare.
| Against | Pro |
|---|---|
| Requires: 1. Node.js infrastructure 2. Managing npm packages (sure, in some extreme cases it causes dependency hell) Leads to slower start. |
Brings: 1. Type-safety 2. Bundling of the test package 3. IntelliSense Reduces maintenance costs in the long run. |
These days, web devs see the downside as a necessary evil that can be easily mitigated.
Consider a testing scenario that’s one step beyond trivial, like in this official example:
import { check } from 'k6';
import http, { StructuredRequestBody } from 'k6/http';

// Uploading file from `assets` folder
const binFile = open('test.png', 'b');
// The targeting service
const url = `https://httpbin.org/post`;

export default (): void => {
	const postData: StructuredRequestBody = { file: http.file(binFile) };
	const response = http.post(url, postData);

	check(response, {
		'status is 200': (r) => r.status === 200,
	});
}
After building (via yarn webpack or npm start), the destination folder (dist) would contain the whole required bundle — the test script and the file for uploading. Note that splitting later a more advanced logic into multiple files would be a piece of cake.
Launch it as any other JavaScript test by k6 run --duration 10s --vus 5 dist/test.js (runs 10 sec with 5 parallel executions).
2. Run k6 in Docker
Deploying tests requires containerisation. The steps for k6 are simple:
- Grab loadimpact/k6, the official Docker container image (”loadimpact” is the k6’s name before rebranding).
- Run the Docker container passing the key parameters in the command line:
docker run -v dist:/disk loadimpact/k6 run -e RESULTS_PATH=/disk --duration 10s --vus 5 /disk/test.jsThe parameters above:
- Map the local
distfolder as a disk (-v dist:/disk). It’s done for- sourcing the test script (the content of
distfolder) and - writing the summary report.
- sourcing the test script (the content of
- Set an environment variable for the script with a path on the mapped disk (
-e RESULTS_PATH=/disk). - Set the executable script on the mapped disk (
/disk/test.js).
Note: for running the container locally, you may need to add --network="host" parameter after the first run to give the container full access to the local system services (docs).
3. Producing jUnit test result report
Most (if not all) modern build pipelines support visualisation of test results in the jUnit XML format. The format is simple, but existence of the spec is obscure (see this SO discussion). Fortunately, the k6 library gives us a simple conversion function (code here).
To make it all work, our tests need to have:
- one or more thresholds for passing/failing a test;
- a conversion function to produce jUnit XML output.
import { check, JSONObject } from 'k6'
import http from 'k6/http'
import { Options } from 'k6/options'

// Copied file from https://jslib.k6.io/k6-summary/0.0.1/index.js
import { jUnit, textSummary } from './utils/k6-summary'

export const options: Options = {
	thresholds: {
		// Required to mark the test as passed/failed
		checks: ['rate > 0.9'], // Passing failure rate < 10%
	},
}

/* The test function */
export default (): void => {
	const response = http.get('https://test-api.k6.io')

	// A check does not fail the test, but simply gives information on the output
	check(response, {
		'status OK': (r) => r.status === 200,
	})
}

/* Customizes the end-of-test summary report */
export function handleSummary(data: JSONObject): JSONObject {
	const ret: JSONObject = {
		stdout: textSummary(data, { indent: ' ', enableColors: true }),
	}
	if (!!__ENV.RESULTS_PATH) {
		const jUnitResultFile = `${__ENV.RESULTS_PATH}/results.xml`
		const logResultFile = `${__ENV.RESULTS_PATH}/results.log`
		ret[jUnitResultFile] = jUnit(data)
		ret[logResultFile] = textSummary(data, { indent: ' ', enableColors: false })
	}
	return ret
}
Build (yarn webpack or npm start) and run locally
k6 run -e RESULTS_PATH=dist --duration 10s --vus 5 dist/test.jsKey points for the above script:
- The jUnit conversion script was saved locally in
/utils/k6-summaryto avoid resolving a web resource in runtime. A better option would configuringexternalsparameter of thewebpack.config.js(link). handleSummary()callback is used to customise the end-of-test summary report (see the docs).- The options’ threshold accepts 10% of failed requests to pass the test. It’s an arbitrary number for the demo, choose the right thresholds that suit you.
- Environment variable
RESULTS_PATHis used for specifying the destination folder on executing the script.
jUnit test results will be inresults.xml.
4. Deployment from Azure DevOps pipeline
Let’s integrate with a build pipeline. If you’re running on Azure with Azure DevOps pipeline, k6 has an pipeline step (marketplace) to run tests right there… And I’d rather talk you out of this.
Deploying the test engine to a capable environment closer to the targeting SaaS product would be the preferable option to avoid skewed results caused by latency or underpowered resources. Something like that:
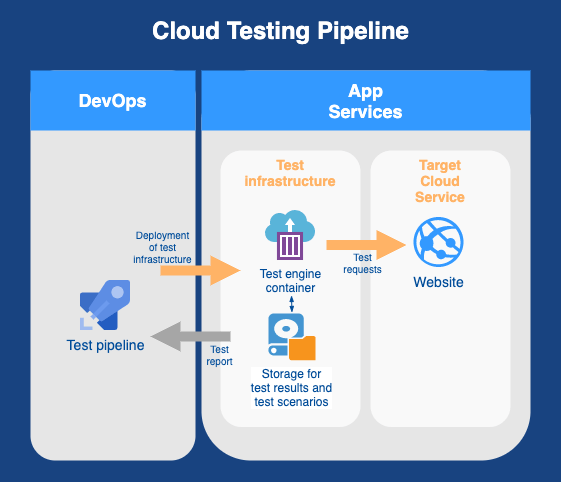
Let’s see what it would look like.
4.1. Build the test script
The first 2 steps of the pipeline are trivial: install Node.js and npm i && npm start.
At this step, $(System.DefaultWorkingDirectory)/dist folder contains the test scripts and all the required artefacts.
4.2. Create resources
The k6 Docker container needs to be deployed to a Resource Group with these resources:
- Container Registry for deploying the k6 engine
- File Storage to map as a disk to read/write files
- Optionally you may want to wrap it up in a Virtual Network (see why use Azure Virtual Network)
Take into account limits and constraints of Azure resources to avoid maxing out on connections, traffic, etc.
The Resource Group could be the one used by the targeting product (that may already have some of the required resources). Though, tinkering with a deployable environment is very undesirable, it might be a trade-off option in some cases.
If you overcome the temptation of reusing the existing resources, you’ve got several options to create and tear down resources:
- Handcrafted
azcommands; - Your favourite IaC (Infrastructure as Code) solution (see comparison of them):
- ARM template or Bicep (a script language abstraction over ARM);
- Terraform (that recently got CDK for TypeScript & Python);
- Pulumi with native support of JavaScript/TypeScript, Python, etc.
ARM templates (along with Bicep) don’t support infrastructure clean-up. A disadvantage but not a deal-breaker for the modest list of required resources that can be deleted manually.
This MS repo has a great Terraform example for creating a all the required resources. It’s dedicated to JMeter integration but after small tweaks would work for k6. Pulumi is also great, it’s a matter of taste 😀.
For simplicity’s sake, in this post I’ll stick to az commands and skip the details of the pipeline YAML craft. It’s assumed that you can wrap the commands below Azure CLI tasks with scriptType: bash. Hope, the variable names I used are self-explanatory.
- Creating a Resource Group
az group create -l westus -n $(ResourceGroupName)- Creating a File Storage
az storage account create -n $(StorageName) -g $(ResourceGroupName) --default-action Allowand a File Share (on our way we save the storage key to a variable to use in further down)
StorageKey=`az storage account keys list -g $(ResourceGroupName) -n $(StorageName) --query [0].value -o tsv`
echo "##vso[task.setvariable variable=StorageKey]$StorageKey"
az storage share create -n $(FileShareName) --account-name $(StorageName) --account-key $(StorageKey)- Creating a Container Registry
az acr create -n $(ACRName) -g $(ResourceGroupName) --sku Standard --admin-enabled true4.3. Copy the build output to Azure File Storage
Now we copy the content of dist folder. To bypass Azure AD authentication to access the storage, we can issue a short-lived shared access signature for executing azcopy command:
start=`date -u '+%Y-%m-%dT%H:%MZ'` && \
end=`date -u -d "5 minutes" '+%Y-%m-%dT%H:%MZ'` && \
sas=`az storage share generate-sas \
	--name $(FileShareName) \
	--account-name $(StorageName) \
	--account-key $(StorageKey) \
	--permissions dlrw \
	--start $start \
	--expiry $end \
	--output tsv` && \
azcopy copy \
"$(System.DefaultWorkingDirectory)/dist/**" \
"https://$(StorageName).file.core.windows.net/$(FileShareName)?$sas" --recursive
4.4. Run k6 Docker container
Create a container group (docs) and run loadimpact/k6:latest with a mapped disk that executes the test script on the start-up:
password=`az acr credential show --name $(ACRName) --query passwords[0].value -o tsv` && \
az container create -n $(ACIName) \
	--resource-group $(ResourceGroupName) \
	--registry-login-server $(ACRName).azurecr.io \
	--registry-username $(ACRName) \
	--registry-password $password \
	--image loadimpact/k6:latest \
	--azure-file-volume-account-name $(StorageName) \
	--azure-file-volume-account-key $(StorageKey) \
	--azure-file-volume-share-name $(FileShareName) \
	--azure-file-volume-mount-path /disk \
	--command-line "k6 run -e RESULTS_PATH=/disk --duration 10s --vus 5 /disk/test.js" \
	--restart-policy Never
Now the pipeline needs to gracefully wait till the tests complete. I like the approach used in the already mentioned MS JMeter pipeline:
echo "`date`: Started!"
while [ $(az container show -g $(ACRName) -n $(ACIName) --query "containers[0].instanceView.currentState.state" -o tsv) == "Running" ]; do
	echo "`date`: Still Running..."
	sleep 10
done
echo "`date`: Finished!"
4.5. Grab & publish test results
At this stage the test results file results.xml is in $(FileShareName). Copy it to the pipeline machine
azcopy copy "https://$(StorageName).file.core.windows.net/$(FileShareName)?$sas" $(System.DefaultWorkingDirectory) --recursiveI omitted above commands for generating a SAS token, as it’s the same as in step 3 above.
Publish the results (docs):
- task: PublishTestResults@2
  inputs:
    testResultsFormat: 'JUnit'
    testResultsFiles: '$(System.DefaultWorkingDirectory)/results.xml'
    failTaskOnFailedTests: true
And delete the created resources. Easy.
Got a question or comment? Leave it below, on Twitter or LinkedIn.
