
It’s a special part dedicated to developers in the series about Identity, Access Management, processes, and flows:
- Needs and means, analysing the requirements for enterprise apps and available off-the-shelf solutions.
- Auth Flows, explaining relevant authentication/authorisation flows (OAuth2, OIDC) with sequence diagrams.
- Writing the code in C#, nuts & bolts of coding a Transparent Auth Gateway in .NET.
- Deploying to Azure, explaining App Registrations and Firewall settings (Azure WAF / Front Door).
Creating a bespoke solution is rarely the fastest or cheapest way, but often it’s the only way to the best user experience and reduced maintenance costs in the long run.
Here we implement a bespoke authentication/authorisation service that
- transparently (without additional user interaction) confirms the identity with the linked Identity Provider (e.g. Azure AD tenant), supporting SSO;
- issues an access token with app-specific attributes (user’s roles/groups/etc.);
- is self-hosted without reliance on third-party services.
A language of choice – C#. A library for high-level abstractions over OIDC/OAuth2 operations – OpenIdDict.
For impatient souls, jump straight to the source code on GitHub.
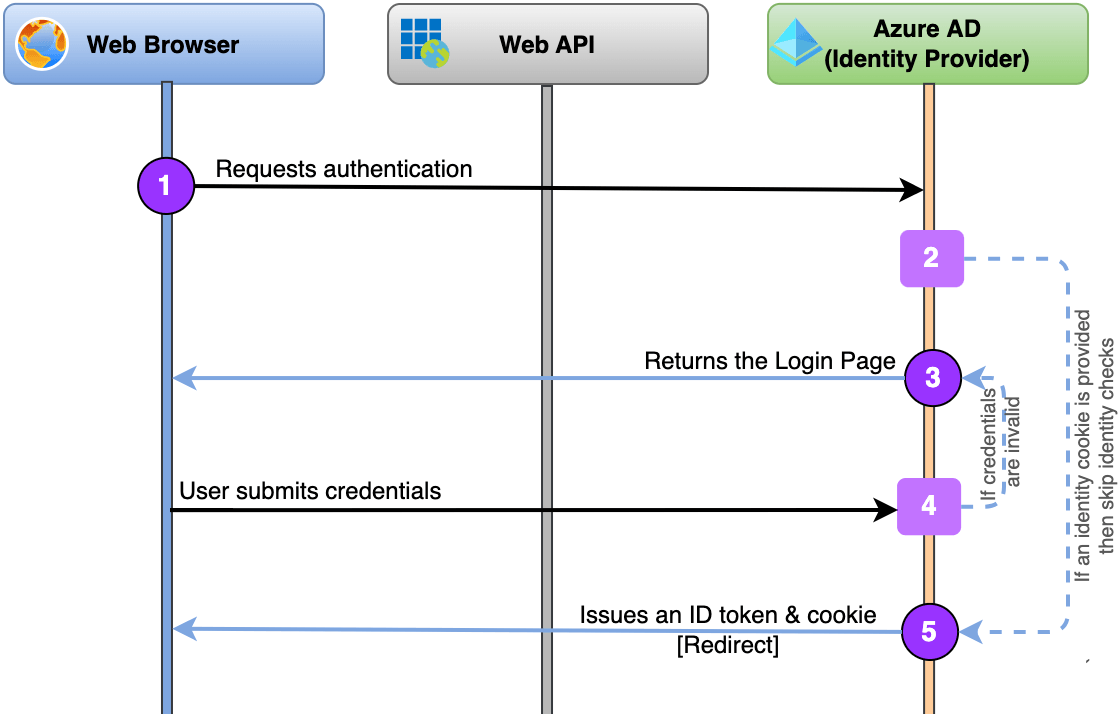
1. Test Azure AD issuing id_token (Swagger UI and WebAPI)
Before jumping to building something big, let’s quickly ensure that Azure AD authentication is configured. The “how to” of configuring App Registrations is described in the next article with the main objective:
- Accept our Client ID and Azure AD tenant.
- Run identity checks.
- Return an
id_tokenwith the user’s profile (name, email, etc.).
Our Auth Gateway will issue its ownaccess_token, so Azure AD is used merely for identity checks andid_tokenwill suffice.
The same flow will be implemented later between our Auth Gateway and Azure AD, where the ”Web Browser” on the diagram below will be replaced with ”Auth Gateway“.
For the simplicity’s sake, we use Swagger UI to acquire a token and the standard Microsoft.Identity way to validate the token on WebAPI.
Acquiring an id_token token will look like this:
About OAuth2 Flows. This part of the implementation uses OAuth 2.0 Implicit Grant Flow (RFC 6749 sec 1.3.2), where the token is returned without an extra authorisation code exchange step. Usually, the implicit flow is not recommended due to the risk of returning tokens in an HTTP redirect without any confirmation that the client has received it.
However, this concern is not applicable to Auth Gateway, as it’s trusted and won’t proceed to issuing an access_token without getting a legit id_token first.
Check out the project’s code in the same repo on GitHub.
There’re some tricky bits in the code due to a lack of Swagger settings for OIDC providers and the API authorising on id_token (sure, it should use access_token only).
To work around constraints of NSwag, we manually set a nonce (see this GitHub issue) and force it to extract id_token instead of access_token (see StackOverflow post)
services.AddOpenApiDocument(s =>
	{
		s.AddSecurity(
			Microsoft.Identity.Web.Constants.Bearer,
			new OpenApiSecurityScheme
			{
				AuthorizationUrl = $"{Authority}/oauth2/v2.0/authorize?nonce=SWAGGER",
				Type = OpenApiSecuritySchemeType.OAuth2,
				Flow = OpenApiOAuth2Flow.Implicit,
				ExtensionData = new Dictionary<string, object> { ["x-tokenName"]= "id_token" },
				Scopes = new Dictionary<string, string>	{ ["openid"] = "Mandatory 'OpenId'" }
			});
		s.OperationProcessors.Add(new AspNetCoreOperationSecurityScopeProcessor(Microsoft.Identity.Web.Constants.Bearer));
	});
It also doesn’t support response_mode=form_post but it’s not critical for the test project.
To work around a problem of Swagger UI that has the ‘response_type’ hardcoded to token for implicit flow (see these Swagger UI and NSwag issues), we inject a JavaScript to overwrite it:
app.UseSwaggerUi3(cfg => cfg.CustomJavaScriptPath = "customSwaggerUiAuth.js");that script replaces a part of the URL on opening a new window (wedging in Swagger’s flow for authentication):
url = url.replace('response_type=token', 'response_type=id_token')The last bit is related to using AddMicrosoftIdentityWebApi() from the MS Identity Platform, where we need to turn off roles validation in the token (set AllowWebApiToBeAuthorizedByACL = true).
It works! Let’s take it to another level.
2. Authentication Proxy (Identity check)
After ensuring above that our Azure AD Tenant behaves as expected, we transfer the Identity checks to a .NET project, our future Auth Gateway, that in this part will proxy Identity requests to the linked Azure AD Tenant.
Remember the long diagram of the Authentication/Authorisation flow in the previous article? Now we’ll implement just this part:
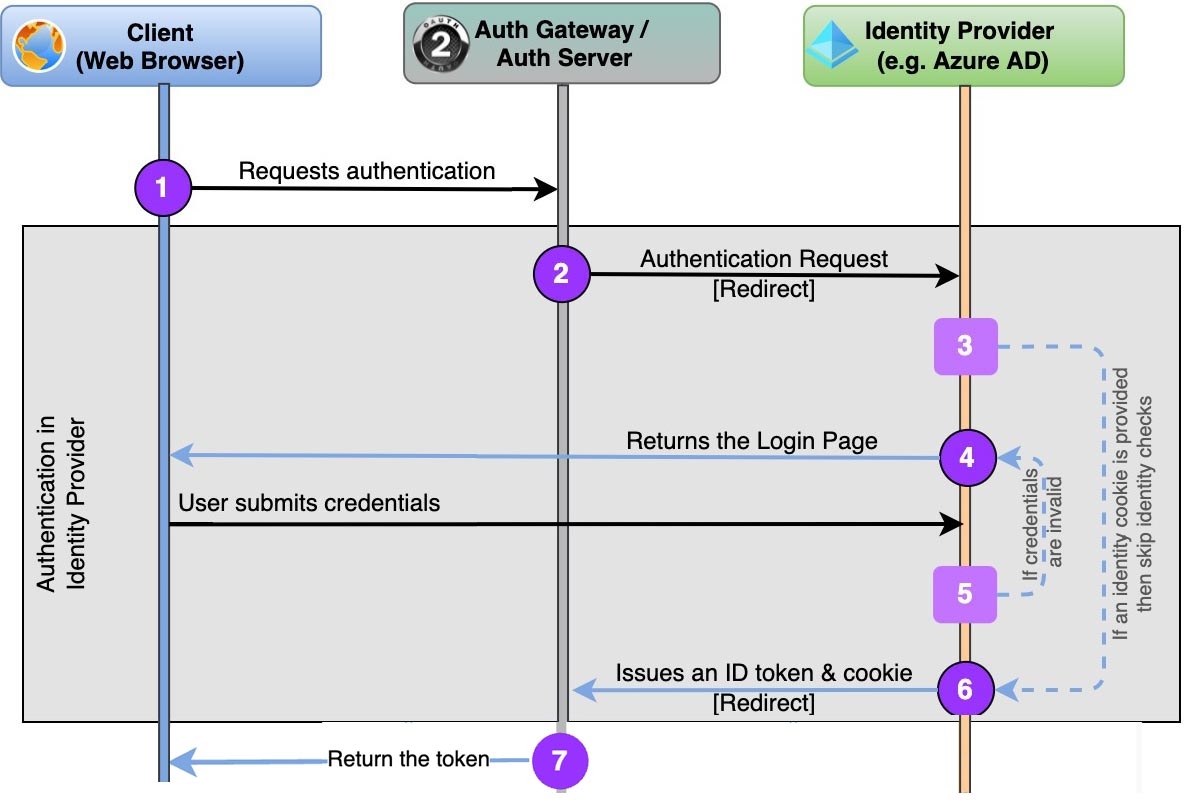
That small task requires:
- An end-point to accept the authentication request.
Ideally, it supports the OIDC Issuer Discovery end-point and the configuration information from OpenID Provider Configuration Document (/.well-known/openid-configuration). - Redirect to the Azure AD Tenant end-point.
This step is almost identical to the one from the Swagger example above. However, it would be great if we don’t handcraft the requests and instead use a high-level abstraction. - Handle a successful response from Azure AD authentication and return the token back.
2.1. The Library – OpenIdDict
In the first article of the series, I briefly compared the two major .NET libraries for implementing an authentication/authorisation service: OpenIdDict and Duende IdentityServer. And as soon as you understand the required protocols and flows (see article #2), the former looks more appealing. This is because it has a bare mode that doesn’t enforce its own logic with a bundle of workflows (e.g. on using the database), but at the same time still provides convenient events/abstractions over the key stages of OAuth2 flows and handling of JWT.
Looks good. How to hook it up to our project?
The minimum code is below, and here is a bit-dated blog post on the subject from its author, Kévin Chalet.
// Register the OpenIddict services
services.AddOpenIddict()
		// Register the OpenIddict server components.
		.AddServer(o =>
		{
			// Enable the authorization and token endpoints
			o.SetTokenEndpointUris("/connect/token")
			o.SetAuthorizationEndpointUris("/connect/authorize")
			// Register the auth event
			 .AddEventHandler<OpenIddictServerEvents.HandleAuthorizationRequestContext>(builder => builder.UseInlineHandler(/* Our implementation! */)
			// Enable the Authorization Code Flow with PKCE and Refresh Token Flow
			 .AllowAuthorizationCodeFlow()
			// Register the signing and encryption credentials
			 .AddDevelopmentEncryptionCertificate()
			 .AddDevelopmentSigningCertificate()
			// Need Degraded Mode to use bare-bones of OpenIdDict
			 .EnableDegradedMode()
			// Register OpenIddict server services for ASP.NET Core
			 .UseAspNetCore();
		})
		// Register the OpenIddict validation services
		.AddValidation(o =>
		{
			// Import the configuration from the local OpenIddict server instance.
			o.UseLocalServer();
			// Register OpenIddict validation services for ASP.NET Core
			o.UseAspNetCore();
		});
The code above:
- registers a bunch of OIDC and OAuth2 end-points for Authorisation Code Flow (RFC 6749);
- provides a handy
HandleAuthorizationRequestContextevent handler (among others) for handling the behaviour each time we hit/authorizeend-point.
The key action of proxying authentication is happening in that HandleAuthorizationRequestContext event handler, where we pass the authentication request to the Azure AD Tenant and handle its response in this snippet:
async context =>
{
	var request = context.Transaction.GetHttpRequest();

	// Retrieve the user principal stored in the user profile cookie.
	var authResult = await request.HttpContext.AuthenticateAsync(OpenIdConnectDefaults.AuthenticationScheme);
	// Check if the user is not logged in.
	if (authResult?.Succeeded != true || authResult?.Principal == null)
	{
		// Auth challenge is triggered to redirect the user to the provider's authentication end-point
		var properties = new AuthenticationProperties { Items = { ["LoginProvider"] = "Microsoft" } };
		await request.HttpContext.ChallengeAsync(OpenIdConnectDefaults.AuthenticationScheme, properties);
		context.HandleRequest();
		// Here we hand over to AzureAD till the user passes authentication
		return;
	}
	// Get here when the user is redirected back from Azure.
	// Now, identity of the user confirmed by the linked OIDC Provider. Can return the token back
}
That is pretty much the key part of the implementation. The library gives us many goodies, including leveraging the MS Identity cookie with the user profile.
3. Adding authorisation (issue own access token)

Don’t want to draw any parallels with the picture above, so the next logical step would be
- Enhance the event handler above to issue own
access_token. - Use Swagger to obtain our
access_tokenbased on Azure AD identity checks.
Add the following code to the HandleAuthorizationRequestContext event handler from above to issue a new Identity:
var name = authResult.Principal.GetClaim(OpenIddictConstants.Claims.Name);
var email = authResult.Principal.GetClaim(OpenIddictConstants.Claims.Email);

// Form new claims
var identity = new ClaimsIdentity(TokenValidationParameters.DefaultAuthenticationType /* sets it to 'Federated Authentication' */);
identity.SetClaim(OpenIddictConstants.Claims.Subject /* unique identifier of the user */, email /* or any unique mandatory identifier, see RFC-7519, 4.1.2 */);
identity.SetClaim(OpenIddictConstants.Claims.Name, name);

// Attach the principal to the authorization context, so that an OpenID Connect response
// with an authorization code can be generated by the OpenIddict server services.
context.Principal = new ClaimsPrincipal(identity)
						// Re-attach supported scopes, so downstream handlers don't reject 'unsupported' scopes or not issue a 'refresh_token' on the grounds of absent 'offline_access' scope
						.SetScopes(authSettings.ScopesFullSet.Keys);

// Set the destination for the added claims to 'Access Token', as they're authorisation-related attributes.
// Another plus, the API controllers can retrieve them from the ClaimsPrincipal instance.
identity.SetDestinations(_ => new[] { OpenIddictConstants.Destinations.AccessToken });
This new identity will be used by OpenIddict for producing tokens (though, in our case, we need just access_token) as a part of the token response.
Now we just need to setup Swagger to authenticate from the same project rather than Azure AD as it was done in step #1 above:
services.AddOpenApiDocument(s =>
{
	s.AddSecurity(
		Microsoft.Identity.Web.Constants.Bearer,
		new OpenApiSecurityScheme
		{
			AuthorizationUrl = "/connect/authorize",	// OpenIddict end-points
			TokenUrl = "/connect/token",
			Type = OpenApiSecuritySchemeType.OAuth2,
			Flow = OpenApiOAuth2Flow.AccessCode
		});
	s.OperationProcessors.Add(new AspNetCoreOperationSecurityScopeProcessor(Microsoft.Identity.Web.Constants.Bearer));
});
...
app.UseSwaggerUi3(cfg =>
{
	cfg.OAuth2Client = new OAuth2ClientSettings
	{
		ClientId = "TestApp",
		UsePkceWithAuthorizationCodeGrant = true
	};
});
And now you can try to go end-to-end from a Swagger UI.👍
One more step to making the implementation more secure is to validate client_id, redirect_uri and scopes in the request. The implementation would be trivial and OpenIddict provides two events for that: ValidateAuthorizationRequestContext and ValidateTokenRequestContext.
The full code you can get from OpenIdDict.Server project of the same repo.
4. Adding a protected API
And final step is to prove that the newly created access token can be used for protecting the API of a different project using the standard .NET handlers. Just add these lines to your project:
services.AddAuthentication(JwtBearerDefaults.AuthenticationScheme)
		.AddJwtBearer(o =>
		{
			// URL of our Auth Gateway
			o.Authority = "https://localhost:5003";
			// Disable as the issued tokens don't include `audience` for the simplicity sake
			o.TokenValidationParameters.ValidateAudience = false;
		});

services.AddAuthorization();
Or you can check a sample OpenIdDict.Client.Api project on GitHub.
That’s it, code-wise. Check out the full code on GitHub and let me know what you think in the comments below, on Twitter, LinkedIn, or Reddit.
