
Continue diving into Identity and Access Management processes and flows. This is a second part of a four-part series on modern authentication solutions for enterprise apps:
- Needs and means, analysing the requirements for enterprise apps and available off-the-shelf solutions.
- Auth Flows, sequence diagrams of relevant authentication/authorisation flows (OAuth2, OIDC).
- Writing the code in C#, nuts & bolts of coding a Transparent Auth Gateway in .NET.
- Deploying to Azure, explaining App Registrations and Firewall settings (Azure WAF / Front Door).
The previous article covered potential solutions for the defined problem statement – providing a transparent ID check from the linked Identity Provider and issuing own access tokens.
All the considered solutions are built on open standards:
- OAuth 2 – an authorisation framework (RFC 6749 & RFC 6750), providing auth flows for web/desktop/mobile/other applications.
- OpenID Connect (OIDC) – an identity layer on top of the OAuth 2 and JSON Web Token (JWT, RFC 6750).
- SAML – a standard for authentication and authorisation typically used for SSO (see specs and a simple explanation from Auth0).
These are the main ones, but there are way more, all coming with RFCs, specs and well-written articles from Auth0 and many others. And here’s the first obstacle where many give up:
One does need a reasonable understanding of the standards to choose the right solution and see how it makes the application secure.
If the above terms don’t frighten you, I hope this article will help you see how those standards can secure your app.
Firstly, let’s outline the key actors participating in sensitive activities:

- Client – an application running in the browser (sure, it needs some JavaScript, but not necessarily a SPA).
- Web App – can be a web application that returns both views (e.g. already mentioned Client running in the browser) and does some back-end processing (e.g. ASP.NET MVC) or a pure back-end Web API service.
- Auth Gateway / Auth Server – the Authentication Gateway (proxying identity validation to the linked Identity Provider) and the Authorisation service trusted by our Web App.
- Identity Provider – an external authentication service confirming the user’s identity (e.g. Azure AD) linked to the Auth Gateway.
Now let’s see what roles they are playing in critical paths of the daily life of an enterprise app.
1. Regular requests. Access tokens, JWTs, cookies and other creatures
A good starting point for understanding secure workflows can be a regular request to a protected resource assuming the user is already authenticated in the system.
Such requests have to carry an object representing the authenticated user. It can be passed in two ways:
- as a cookie;
- as a bearer token in the HTTP header as per OAuth 2.
Hmm… Two important notes about cookies:
- Cookie-based authentication is implemented by each web platform differently. Ultimately, they all end up issuing a cookie (tied to a session on the server) that represents the authenticated user.
- To use stateless (client-side) cookies for multiple Web Apps, they (all the apps) need to have the key to encrypt/decrypt or sign the cookie. However, that might cause some concerns about leaking the key and a headache when rotating the key.
- As for stateful cookies… Well, it’s just a pointer to a database record that would require the DB access from all the apps adding a bit extra latency.
These scaling issues and, of course, the inability to be used for API requests is a major deal-breaker for modern enterprise apps. So, we steer towards bearer tokens. Specifically, OAuth access tokens are sent as bearer tokens (they also can be ”sender-constrained” tokens, but it’s a different story) that will work as credentials to access protected resources.
Interesting that Auth 2.0 doesn’t dictate the format of bearer tokens (RFC 6750), though structured tokens such as JSON Web Tokens (JWT) are a de facto standard these days.
Therefore, JWT access tokens define the flow for regular requests:

- Our application running in the browser submits a request to the Web App providing an acquired earlier access token:
GET /resource HTTP/1.1
Host: server.example.com
Authorization: Bearer eyJhbGciOiJIUzI1NiIsInR5cCI6...- The Web App requests the public key from the Auth Server for JWT signature validation:
GET /.well-known/jwks HTTP/1.1
Host: auth.example.com- The Web App validates the token: not expired, has the right issuer, scope, and the signature checks out (that’s what the public key was for).
- If all checks are passed, the Web App returns the requested resource. Otherwise – returns a HTTP 403.
As was established in the previous article, the token has to carry some application-specific information and hence has to be issued by our Auth Server. Therefore, the Auth Server is used to validate the JWT signature, and the Identity Provider is not engaged in the regular requests at all.
Something to note:
- For performance-critical apps, step #2 can be skipped by copying the public key to the Web App. It’ll speed up the signature validation but will cause more work when you need to rotate the JSON Web Key Sets.
- The Client (the browser app) doesn’t have to validate the token’s signature, as all the sensitive data comes from the back-end that does the validation.
2. Authentication/Authorisation flow
Now to a more interesting question – how to acquire the access token?
Based on the above, we can outline three main stages:
- Authentication (identity validation) from the linked Identity Provider (as per the OpenID Connect spec).
- Our custom authorisation is implemented in the Auth Gateway / Auth Server.
- Issuing and returning the access token from the Auth Gateway / Auth Server (as per the OAuth 2 spec).
With more details, the full flow would look like this:
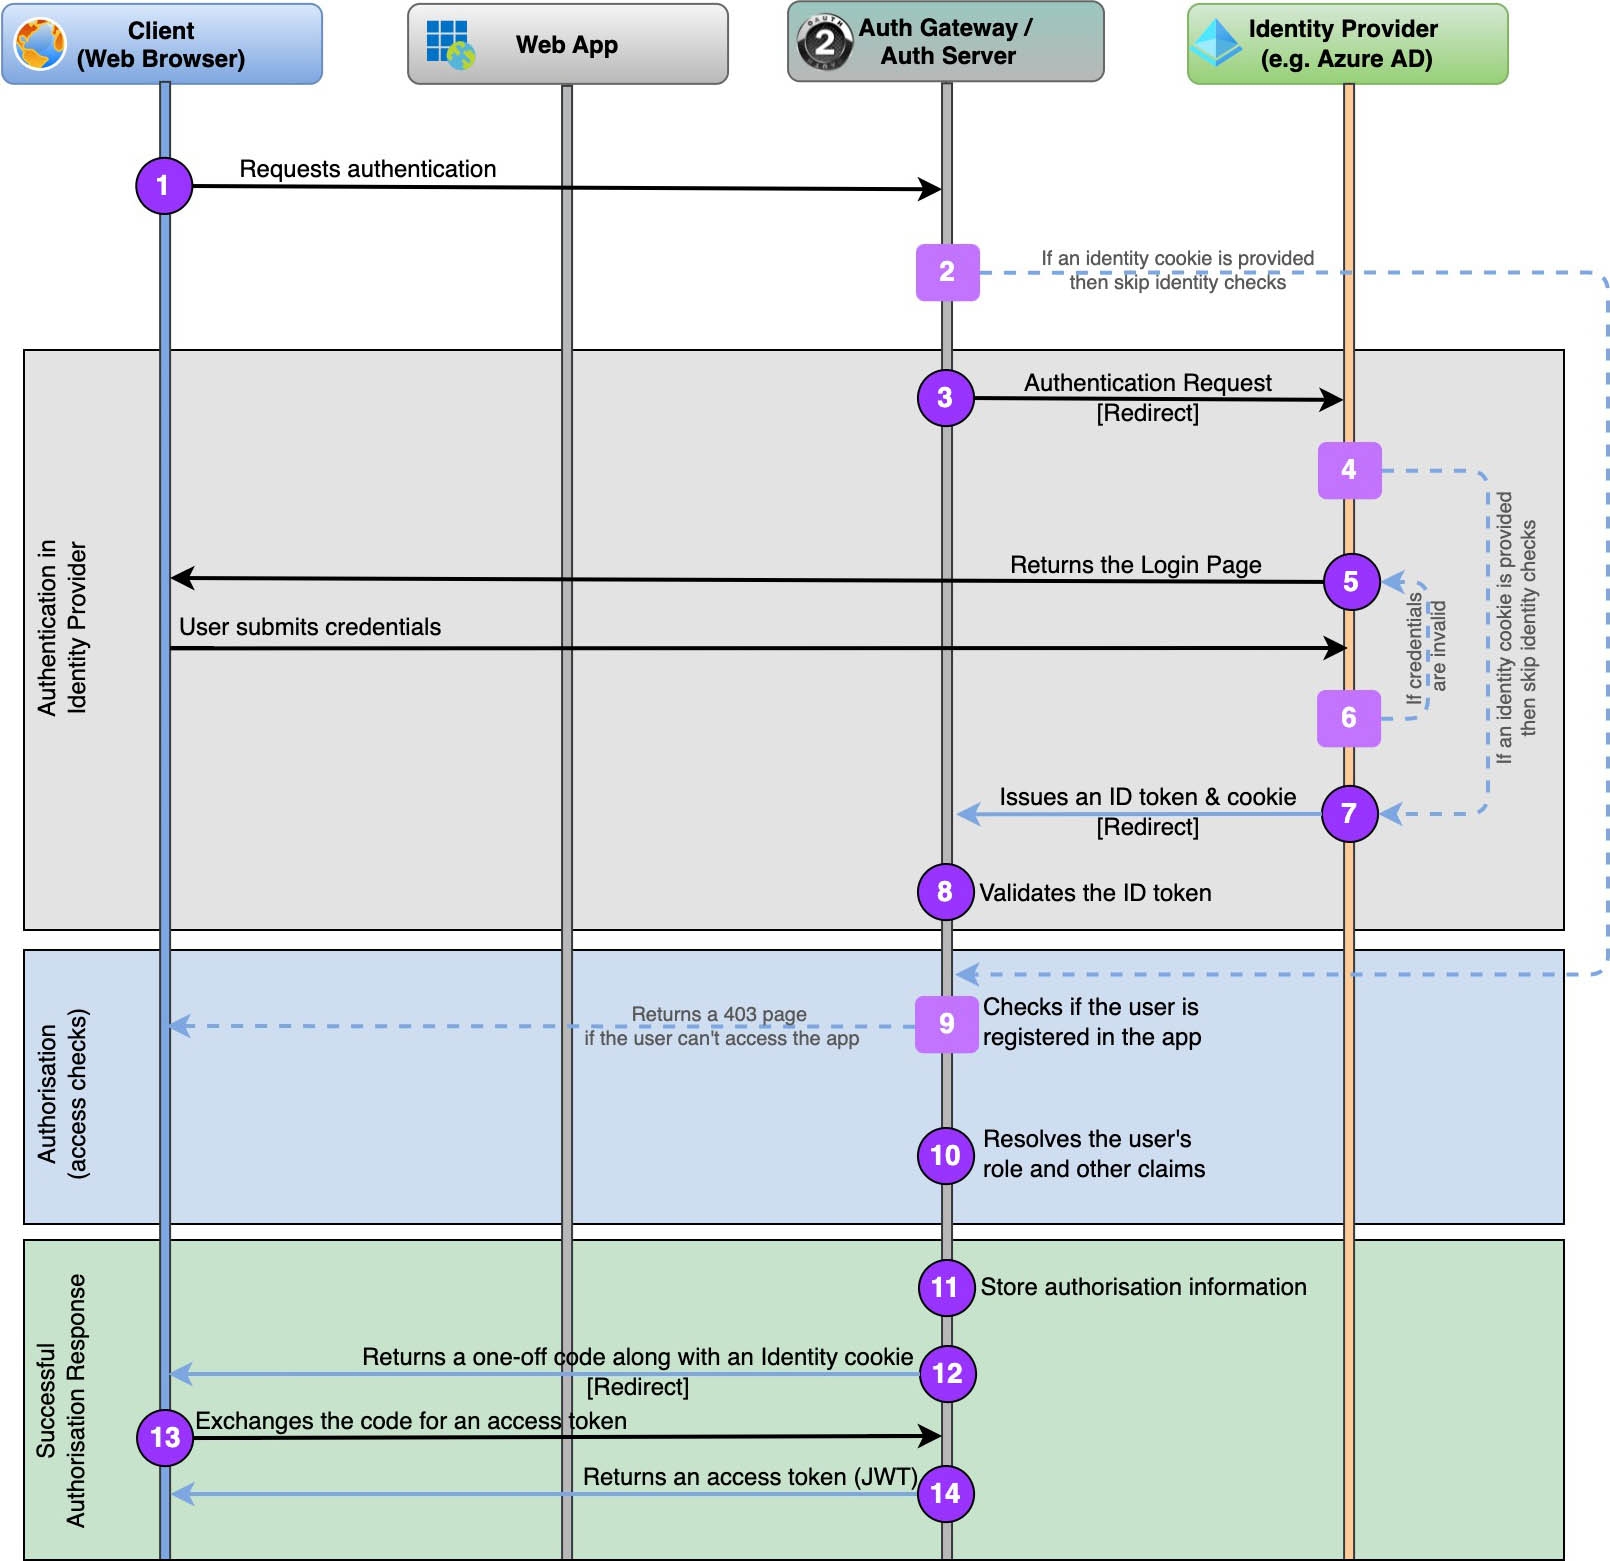
Explanation of the steps:
| Step / Actor | Description |
|---|---|
| #1. Client | The user requests authentication by hitting a special end-point of the Auth Gateway / Auth Server. Likely, it’s a reaction on a received 401/403 code by the Client app. Usually, it’s /authorize end-point, but if the exact end-point is unknown, it can be revealed in the discovery stage – the OIDC standard provides an Issuer Discovery end-point and the configuration information from OpenID Provider Configuration Document (/.well-known/openid-configuration). |
| #2. Auth Gateway | Once the browser has redirected to the authorisation end-point, it may supply an identity cookie issued earlier by the server. It’s considered trustworthy, and the process can skip the identity check steps jumping straight to step #9. |
| #3. Auth Gateway | The Auth Gateway delegates identity checks to the linked Identity Provider. Hence, it silently redirects the user further to the Identity Provider’s authentication end-point (like in step #1), providing a seamless user experience. |
| #4. Identity Provider | Like step #2, the browser may supply an identity cookie issued by the Identity Provider earlier. If the identity can be resolved from the cookie, then skip forward to step #7. |
| #5. Identity Provider | Prompts the user’s credentials by returning the login page to the user. |
| #6. Identity Provider | If the provided credentials are invalid, the user stays with the Identity Provider staring at the error messages and following their guidance. |
| #7. Identity Provider | Once the user’s identity is confirmed, the Identity Provider issues an ID token and a handy identity cookie to ease the process for returned users. It all gets returned by sending a HTTP POST to a special return page of the Auth Gateway that has to be white-listed on the Identity Provider side. |
| #8. Auth Gateway | The Auth Gateway validates the id_token (the issuer, expiration, signature, etc.).The user’s identity is confirmed! |
| #9. Auth Server | Now we proceed to authorising the user. The first step is confirming the user is registered within the app. If not, redirect to the ’Not Registered’ page. |
| #10. Auth Server | Optionally, the Auth Server resolves application-specific attributes that will be added to the access token claims. The user is authorised, now we need to notify him/her in a secure way. |
| #11. Auth Server | To resolve future token requests, the Auth Server saves the authorisation information in a temporary storage (can be in-memory or a DB). |
| #12. Auth Server | Following the OAuth 2 Authorisation Code Grant (RFC 6749) with PKCE (RFC 7636) the Auth Server redirects the user to a special page submitting a temporary code that the Client’s code will exchange for an access token (allowed only once). |
| #13. Client | Requests from the Auth Server an access token based on the provided code. |
| #14. Auth Server | The access token is issued by the Auth Server and received by the Client! |
It was easy, huh? If you want a more detailed explanation of OAuth+OIDC requests, check out Learn Authentication The Hard Way series from Andrew Best. Other questions are addressed below.
2.1. Which authentication protocol to use for the Identity Provider?
The authentication protocol is defined by your single authentication authority, the Identity Provider. It can be OAuth + OIDC, SAML, WS-Federation / WS-Trust, or any proprietary protocol.
The example above used OIDC (steps from #3 to #8) as the most popular authentication protocol these days.
2.2. Will the shown implementation support SSO? Is OAuth+OIDC better than SAML?
Yes, it does support SSO by relying on identity cookies issued by the Auth Gateway / Auth Server and the Identity Provider.
And no, OAuth+OIDC is not better or worse than SAML. The main difference boils down to SAML being older and having a broader spec (see this discussion on SSO, and this about the differences).
Modern apps are very diverse, and a correctly picked OAuth grant type can make apps more secure than with SAML (check out OIDC Financial-grade API Security Profile). BTW, the diagram above shows OAuth 2 Authorization Code Grant with PKCE, which is the best pick for Single Page Applications.
3. Refreshing Access Tokens
As the Client app in the browser can outlive the access token (their expiration is configurable but usually set to an hour), it has to silently refresh the access token securely without disturbing the user’s work.
To help us out, OAuth provides us with a Refresh Token grant type that’s easy to use:
- Firstly, the Auth Server has to be configured to issue a refresh token along with the access token (step #14 in the diagram above). See RFC 6749 s1.5.
- And when the Client feels like refreshing a token (mind that they may expire too), they exchange the given refresh token for a new pair of access and refresh tokens (RFC 6749 s6).
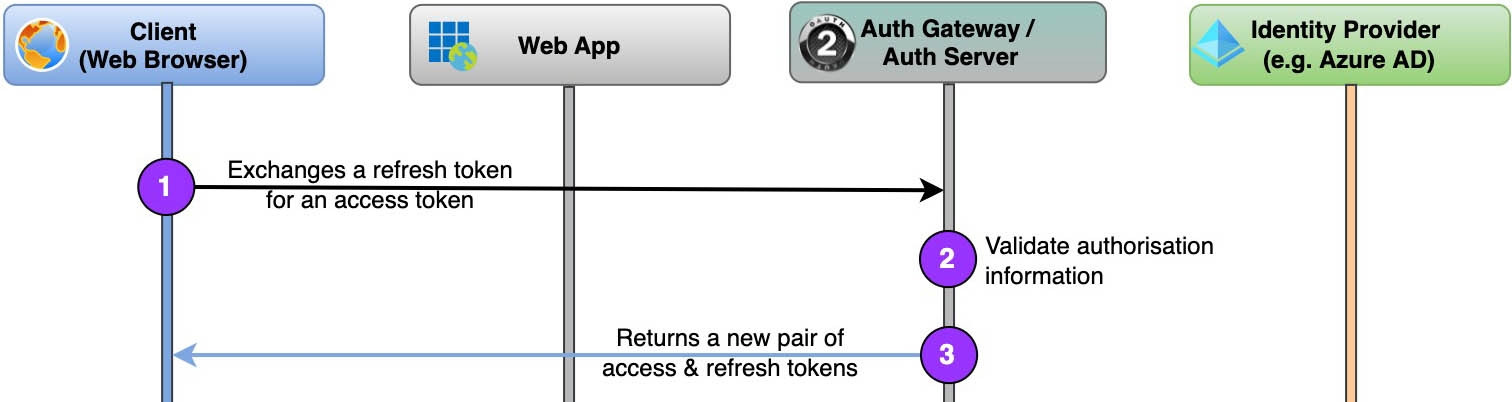
Notice that the Identity Provider is not engaged in this process. That means you can log out of the Identity Provider (e.g. Azure AD) but still get an extended access token for your app.
If you don’t like it, you may need a Single Logout (SLO). In its implementation, Auth Gateway has to request and store a subsequent refresh token for the Identity Provider and propagate the refresh flow to the Identity Provider under the hood of each refresh request to Auth Server.
4. Log out
And at last, the easiest flow – logging out of the app:
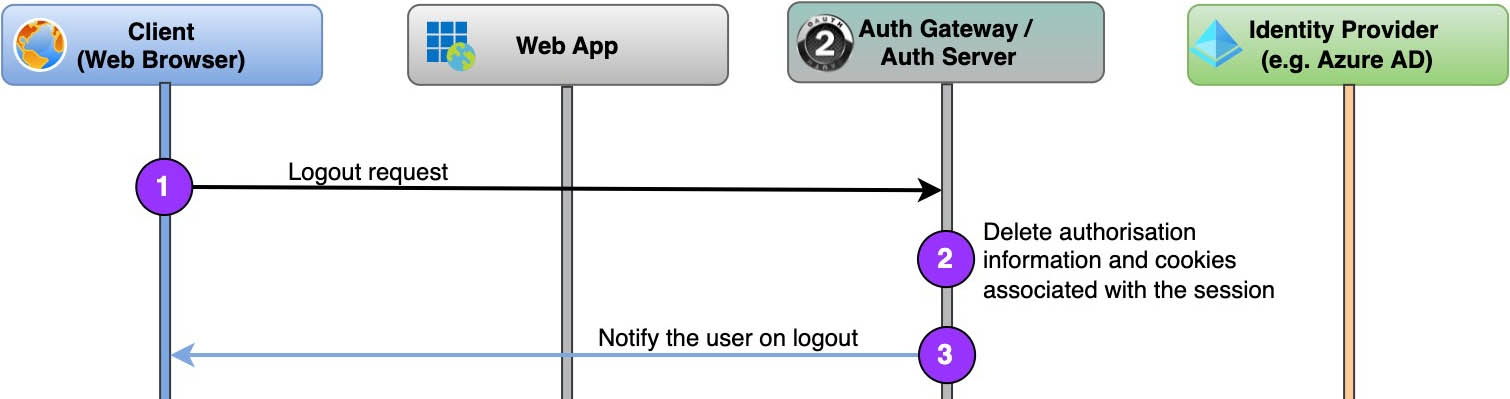
And again, if you need a Single Logout (SLO), just replace step #3 to a redirect to the Identity Provider logout page.
Once we got the workflows covered, in the following article we’ll see how easy is to implement a Transparent Auth Gateway in .NET. Stay tuned and have your say in the comments below, on Twitter, LinkedIn, or Reddit.
